
pommel
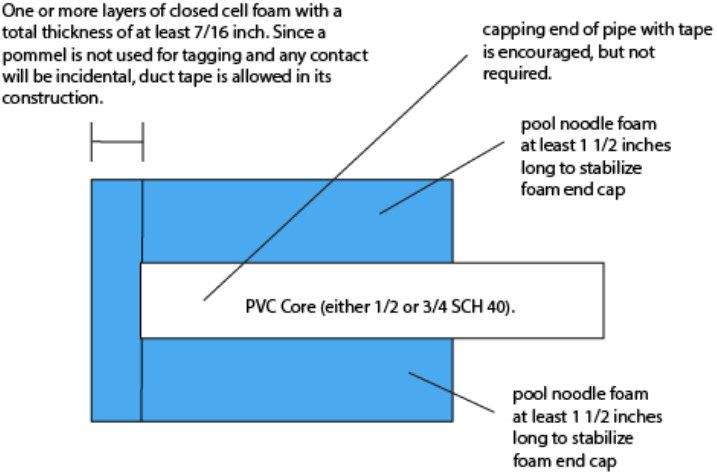
pommel blueprint
Pommel Rules
In addition to the rules outlined in the above diagram:
- All boffers except for double-ended boffers must have a pommel.
- Pommels must have at least 1/4 inch compression allowance in the foam. Allowed construction materials are pool noodle and any other Marshal approved closed-cell foam.
- Pommels must be secure with no allowance for slipping to the side, falling off, etc. If any PVC core becomes exposed, the boffer must immediately be pulled from play until the pommel can be repaired.
- Pommels may be decorated with paint, fabric, duct tape, etc. so long as there is no risk to the person wielding this boffer or to any others. For example, if paint or duct tape hardens and begins to peel into jagged edges, Marshals may pull the boffer from play until the pommel can be repaired.
Pommel Construction
A pommel is the part of a boffer that is opposite the striking end. It exists to help the Participant maintain their grip on their boffer. For a depiction of where a pommel sits on a sword, mace, axe, spear, or glaive, please consult the respective pages for each type of boffer in the Blueprint Library.
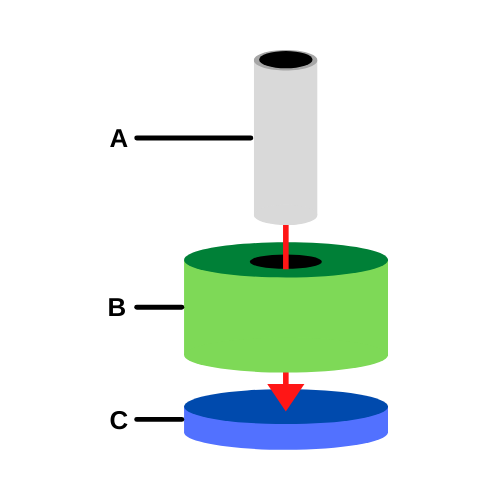
Materials: The first thing you need to building a pommel is the core of the boffer you are building (A). This should be ¾ inch or ½ inch schedule 40 PVC, depending on what kind of boffer you are building:
- Boffer cores or hafts: All boffers shall have a core composed of ¾ inch schedule 40 PVC. Sword boffers that are 42 or less inches in length may use ½ inch schedule 40 PVC.
You will also need 2″ of pool noodle for the body of the pommel (B). Make sure that your pool noodle has at least ½ inch of padding from the hole in the middle to the outer rim!
The third part is the foam disc that goes on the end (C). A good type of foam for this is the blue camping mat that is sold in Walmart. It’s cheap and durable while also having some give. Make sure that the foam discs match the diameter of the pool noodle you’re using!
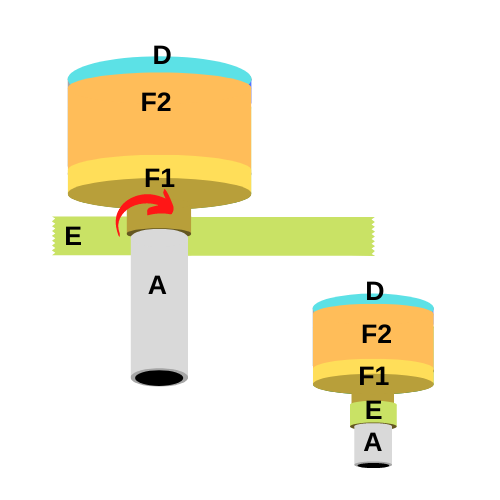
1 Get tape ready. Measure and cut 4 pieces of tape that are roughly 11″ long. Take one if the pieces and tear it in half in the middle. Then, take these two shorter pieces and tear them in half lengthwise (D). Finally, tear one of the remaining long pieces down the middle (E). This will leave you two long, complete pieces (F).
Please note that you will have one E strip remaining after constructing the pommel. This strip can be used to affix other parts of the boffer, such as when you’re affixing the blade to the grip.
2 Affix disk. Next, use the smallest pieces of tape (D) to attach the blue disc (C) to the pool noodle (B). Following the “star” diagram, use all 4 pieces of small tape (D) to securely attach the blue disk (C) to the pool noodle (B). By the time you are done, there should be very little blue disk visible.
Don’t tighten the (D) pieces of tape too much! They should be snug, but not tight. If you tighten the tape too much, the foam will become rigid and inflexible, defeating the purpose of the padding.
The pieces of tape that you use to make this “star” shape does not have to connect to the haft (A). As long as they connect the disc (C) securely to the pool noodle (B), you should be good!

3 Make a tube. Make sure that the PVC core (A) is sitting flush (but not pressing hard) against the disk. Next, take one of the large, whole pieces (F1) and place it so that about 1/4 inch to ½ inch is on the pool noodle (B). The rest should be free and will make a “tube” when rolled.
Make the tube by carefully wrapping the tape around the bottom. Don’t scrunch it yet! We need to place another piece of tape above it to make sure that (F1) doesn’t get loose.
4 Lock down the star. After the first large piece of tape is secured and ready, take the other large piece of tape (F2). Overlap this piece of tape on top of (F1) by 1/4 inch to ½ inch. In the same way you wrapped (F1), wrap (F2) around the pommel, locking everything down.
Once again, make sure that it’s not excessively tight! It should be snug, but there should still be some give in the foam padding beneath it.
5 Tuck in the tube. No it’s time to tuck in the tube and fasten the pommel to the PVC core (A). Using two fingers, tuck in 2 opposite ends of the tube ( –> O <– ). When you do this, make sure that the tape is secured to the underside of the pommel. The tape should go from the pool noodle (B)’s side, tuck tightly underneath (B), then attache firmly to the PVC core (A).
After tucking in the first two areas, scrunch the rest of the tape (F1) in. It doesn’t have to be pretty, as long as all of the tape (F1) is sticking to the PVC core (A).
This is one step where it is advisable to get the tape relatively tight! There is very little risk of someone getting hit with the inward side of the pommel.
6 Lock down the tube. This is the final step for making a pommel! Using one of the long, thin strips of tape (E), wrap the ends of (F1) down to the PVC core (A) tightly. It will circle around itself a lot, and that’s okay!
After that, give the pommel a little test by pulling and pushing it around a bit, ensuring that it will not fly loose. If it hold up, it will work! If you’ve followed these instructions carefully, your pommel will pass inspection.