

sword
sword blueprint
sword Rules
The sword boffer has a pommel, a handle for one or two hands (depending on size) and a “blade” that takes up the remainder of the length of the boffer. The table below covers the allowable lengths and wielding requirements by rank for Swords:
| Rank | Squire | Knight | D. Knight | Cavalier | Dragoon | Lancer | Sentinel |
| Band Color* | Red | Orange | Yellow | Green | Blue | Purple | Pink |
| Max Length | Up to 26″ | Up to 26″ | 26 – 32″ | 32 – 38″ | 38 – 42″ | 42 – 50″ | 50 – 62″ |
| Wielding** | Dual | Dual | Dual | Dual | Dual | Single | Single |
*This is the rank of the boffer, not the player. A player can always use a lower rank’s equipment. Always mark to the lowest available rank (for example, any 26″ sword will be marked with Red tape).
**”Dual” means that the boffer can be used with another boffer, if the player’s rank permits and so long as the loadout does not exceed 6 feet in length. “Single” means that the boffer can only be wielded alone.
In addition to the rules outlined in the above blueprint and table:
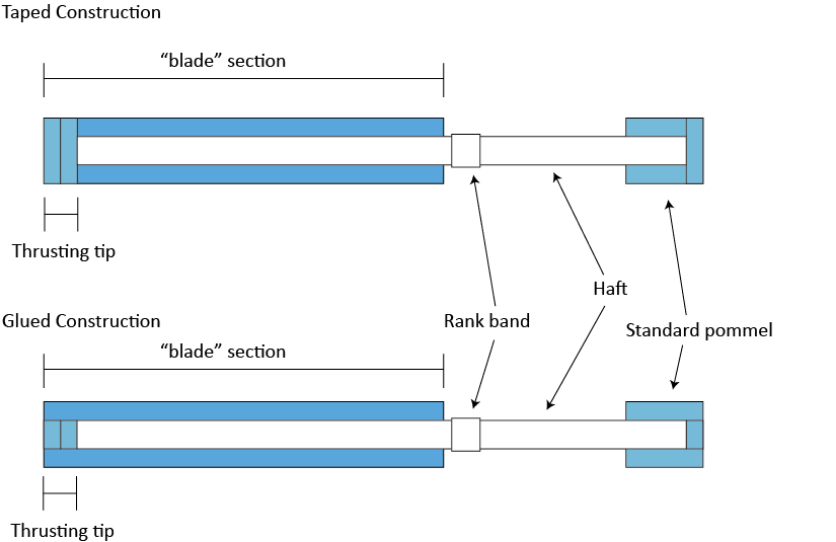
- The PVC core of a sword boffer shall consist of a single piece of ¾ inch schedule 40 PVC pipe. If the boffer is 42 inches in length or less, ½ inch schedule 40 PVC pipe is acceptable. In either case, no splices are allowed.
- The non-tagging end of a sword boffer shall have a standard Pommel. Pommels shall not be hurled at one’s foes to “end them rightly”.
- The “blade” of a sword boffer shall be constructed from closed cell foam at least ½ inch thick. Pool noodles are generally acceptable for blade construction. Care should be given in choosing foam for the blade in making sure the foam has some give to it. Camp mats like the “blue Walmart mat” work well for this. Some other types, like “puzzle mats” may be too stiff and not compress enough. The blade shall have a length of at least twice the length of the handle section. Sword boffers are required to have a Basic Thrusting Tip.
- The blade profile or thickness shall not exceed 3 ½ inches in any direction. Another way of looking at this is that the blade should be able to fit through a circular opening 3 ½ inches in diameter.
- A sword boffer may have a combination of glued and taped components.
- Decorative “cross-guards” can be made using ½ inch foam no more than 5 inches long and 2 ½ inches wide. In game terms, they do not actually do anything, and generally follow the rules for courtesy foam. They are otherwise governed by Equipment Rule Zero:
- When deciding if equipment should be allowed on the field, a Marshal always has the option to say “no” in the name of safety. This applies even if the boffer or shield otherwise meets requirements. Our rules as to what is and is not allowed are not all encompassing.
Squire Sword Construction
The following tutorial has lengths that are standard for Squire boffers, or the starting boffer that a player can have. If you are building a sword for a participant of a higher Rank, please consult the size chart to ensure that you or your child will be able to use your boffer on the field of play. Each Rank (or level) of Participant can use different types of boffers, so there are some limitations on what they can use. If your boffer does not meet the safety requirements and the length rules for your child’s rank, the Marshals will likely not approve the boffer for play.
Materials:
- The first thing you need to building a sword is the core of the boffer you are building (C). This should be ¾ inch or ½ inch schedule 40 PVC, depending on what kind of boffer you are building:
- Boffer cores or hafts: All boffers shall have a core composed of ¾ inch schedule 40 PVC. Sword boffers that are 42 or less inches in length may use ½ inch schedule 40 PVC.
- After that, you will need the bulk of the sword, or the “blade” which will be made out of pool noodle (B). Make sure that from the hollow center of the pool noodle to the edge there is at least 1/2 inch of padding!
- You will also need all the parts for making a Basic Thrusting Tip (A) (2 foam discs, a PVC cap, and strapping tape).
- Lastly, you will need all the parts for making a Pommel (D) (a 2″ piece of pool noodle and a single foam disc).

1
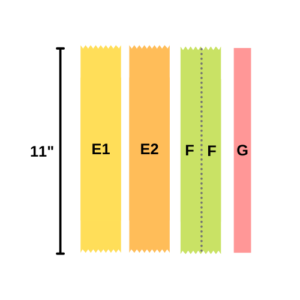
Get tape ready. For this part, you will need duct tape. The part we will be taping is the connection between the blade and the handle, and it’s low enough on the blade that it is not considered a “strike zone.” Take 3 pieces of duct tape in your preferred color and cut them both at 11 inches in length. Split one of these pieces in half lengthwise.
You will also need a bit of colored tape to designate the rank the sword can be used by (G). If you are making a Squire sword, this will be a bit of red tape. For all other ranks, consult the table above.
You can also choose to look at the tape requirements for your Thrusting Tip and Pommel, if you would like to get those ready now, too. But don’t assemble them yet!
2 Assemble thrusting tip. Instructions for assembling a Thrusting Tip. You will need 2 blue foam discs, a PVC cap, and strapping tape.

3 Assemble pommel. Instructions for assembling a Pommel. You will need 1 blue foam disc, a 2″ section of pool noodle, and duct tape in your choice of color.

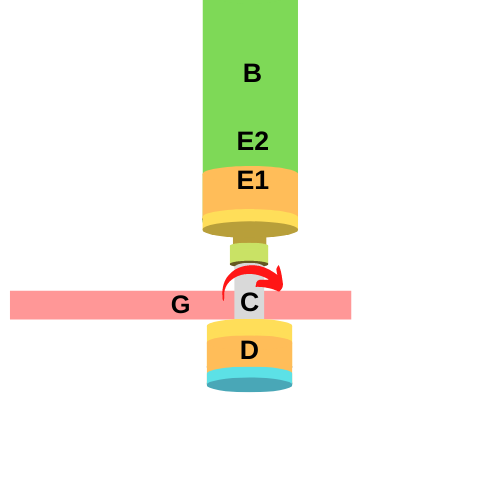
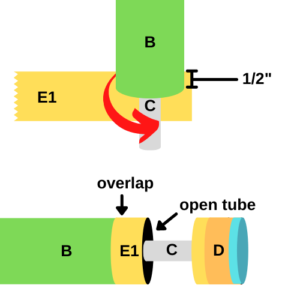
4 Make a tube. After the thrusting tip and the pommel are completed, it’s time to attach the blade to the handle! This is an important step, as there have been instances of poorly secured blades that literally “fly off the handle!”
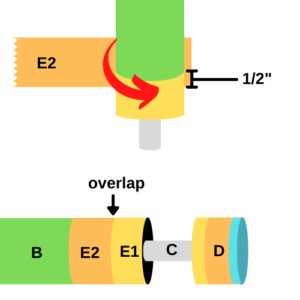
Start by taking one of the whole pieces of duct tape (E1) and make a tube around the base of the blade (B), making sure that there is roughly 1/4 inch to 1/2 inch of the tape on the blade. The rest of the tape should be “hollow” around the handle (C).
5 Lock down the tube, part 1. Next, we lock down the upper part of the tape, the part that is in contact with the blade. Taking your other whole piece of duct tape (E2) and wrap it around the top of the piece of tape that’s already on the blade. Make sure that there is a 1/2 inch to 1/4 inch overlay from (E2) on top of (E1).
Make sure that the tape is snug, but not tight! On the off chance that someone is hit with this part of the blade, we do want to ensure that the foam will properly compress and absorb the force.
6 Tuck in the tube. After the top of the hollow tape (E1) is securely affixed, take two fingers and push in the base of (E1) so that it’s tucked tightly against both the base of the blade (B) and then securely against the handle (C).
After these two connection points have been connected, press the remainder of the (E1) tape against the handle (C). This should give you a rough connection between the blade and the handle.

7 Lock down tube, part 2. Once the tape (E1) is pressed against the handle (C), use one of your long, skinny pieces of tape (F) to lock down the tail-end of (E1). This can be as tight as you’d like, as there are no parts that can be over-compressed here. Wrap the entire length of (F) around (E1) until it is tightly affixed.

8 Mark according to rank. Almost done! Using the chart below, mark the minimum rank requirement for the sword. For example, if you built a 42″ sword, you would mark it with blue tape, as the minimum rank that can use it is a Dragoon.
For a Squire boffer (a sword using the measurements above), this will be a piece of red tape.