enhanced Thrusting Tip
This is the thrusting tip that MUST be used on spear boffers longer than 62 inches or longer. For the thrusting tip for most boffers, check out the Basic Thrusting Tip.
Enhanced thrusting tip blueprint
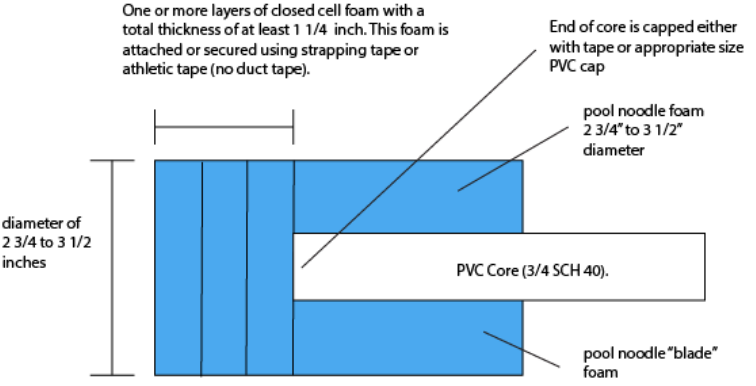
enhanced Thrusting Tip Rules
In addition to the rules outlined in the above diagram:
- All spears longer than 62 inches must have an enhanced thrusting tip.
- Enhanced thrusting tips must have at least 1 1/4 inch thickness and have 1/2 inch compression allowance in the foam. Allowed construction materials are the blue camping mat from Walmart and any other Marshal approved closed-cell foam.
- Enhanced thrusting tips must be secure with no allowance for slipping to the side, falling off, etc. If PVC core becomes exposed, the boffer must immediately be pulled from play until the thrusting tip can be repaired.
- Enhanced thrusting tips may only be secured with strapping tape or athletic tape. They may not be decorated with paint, fabric, duct tape, etc. Markers may be used to decorate the enhanced thrusting tip, if the participant desires.
- At this time, enhanced thrusting tips may not be covered with any sort of fabric, sock, etc. that may hide it from view and inspection.
enhanced Thrusting Tip Construction
An enhanced thrusting tip is a very important part of spears greater than 62 inches. These are particularly useful, as the striking area of the tip is wider, allowing for force to be dispersed across a larger area. The tip itself is a well padded area that is composed of three or more layers of soft foam padding (such as camping mat) to soften tags with this part of the boffer. Rules for spears that require enhanced thrusting tips can be found in the Blueprint Library.
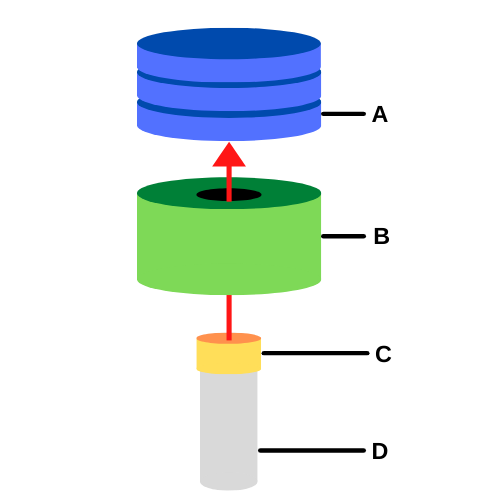
Materials: The first thing you need to building a thrusting tip is the core of the boffer you are building (D). This should be ¾ inch schedule 40 PVC.
In addition to the PVC core, you will need a PVC cap (C) that fits the type of PVC you are using. This cap can be of any schedule so long as it is appropriately sized and will not slip or fly off.
You will also need a length of pool noodle for the body of the blade (B). Make sure that your pool noodle has a diameter of at least 2 3/4 inches of padding!
The last part are the two (2) foam discs that go on the end (A). A good type of foam for these is the blue camping mat that is sold in Walmart. It’s cheap and durable while also having some give. You will also need duct tape in a color of your choosing. Make sure that the foam discs match the diameter of the pool noodle you’re using!
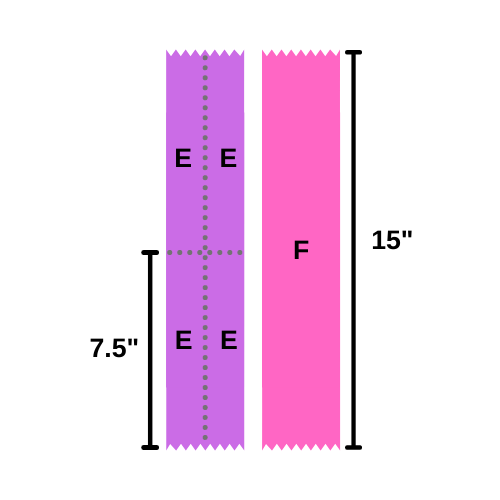
1 Get tape ready. Measure and cut 2 pieces of strapping tape that are roughly 15″ long. This tape must be either strapping tape or athletic tape; duct tape tips will be denied for field use. Take one if the pieces and tear it in half in the middle. Then, take these two shorter pieces and tear them in half lengthwise (E).
If you are using athletic tape, you may not have a strip as wide as is shown for tape (F). If this is the case, simply prepare one extra long piece of athletic tape (roughly 22-26″ in length) to wrap a few times around the thrusting tip.
2 Attach PVC cap. Next, take the PVC cap (C) and firmly attach it to the PVC core (D). It should not fall off. In fact, ideally it should be difficult to remove without a tool.
Once the PVC cap is secure, move the spear-head portion of the pool noodle (B) upward. This pool noodle should be wide in diameter, from between 2 3/4 inches to 3 1/2 inches. Moving the pool noodle is best done in a spiraling motion so that the foam does not tear. Move the pool noodle until it is flush with the top of the PVC cap.
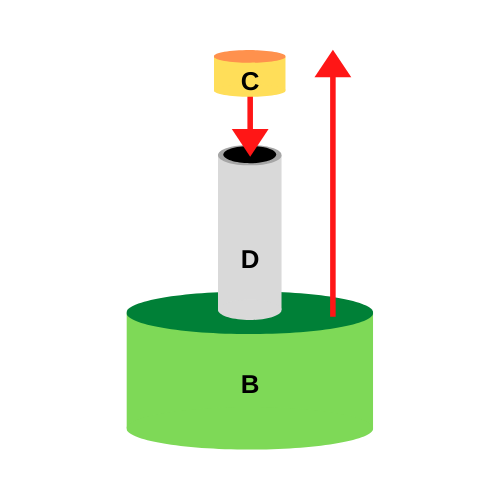
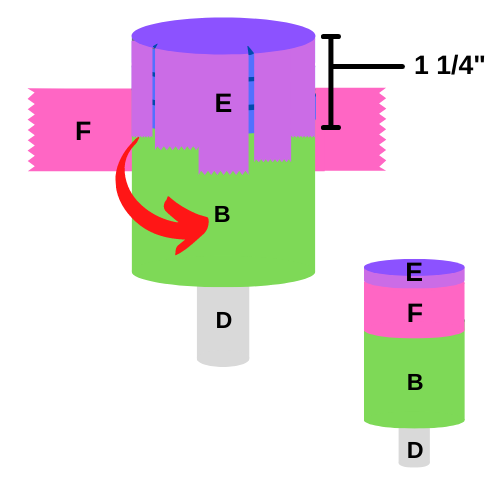
3 Affix the discs. Make sure that the PVC core (D) and cap (C) are sitting flush (but not pressing hard) against the disks. Next, use the smallest pieces of tape (E) to attach all three blue discs (A) to the pool noodle (B). Following the “star” diagram, use all 4 pieces of small tape (E) to securely attach the blue disks (A) to the pool noodle (B). By the time you are done, there should be very little blue disk visible.
Don’t tighten the (E) pieces of tape too much! They should be snug, but not tight. If you tighten the tape too much, the foam will become rigid and inflexible, defeating the purpose of the padding.
The pieces of tape that you use to make this “star” shape does not have to connect to the haft (D). As long as they connect the disc (A) securely to the pool noodle (B), you should be good!
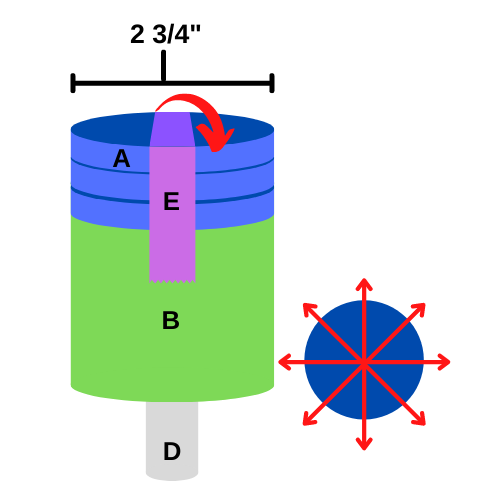
4 Lock down the star. After the first large piece of tape is secured and ready, take the large piece of tape (F). Keep it close to the top, about 1/4 inch away from the end of the thrusting tip. Wrap this around to lock all of the smaller pieces of tape down (but not too tight!).
Be especially careful of over-tightening if you are using athletic tape and wrapping it around. It can be very easy to compress the tip too much and take away the squishy-ness that makes it safe.
After that, give the thrusting tip a little test by pulling and pushing it around a bit, ensuring that it will not fly loose. If it holds up, it will work! If you’ve followed these instructions carefully, your pommel will pass inspection.
